ROS 2 Tutorial for Beginners (Part 10.1): Building a Number Processor with Publishers and Subscribers
Satyarth Shree · 25 minute read
Build a complete ROS 2 mini project by creating a random number publisher, processing data with a subscriber, and validating communication using ROS 2 CLI tools.
In previous part of this tutorial series, we covered how various command line tools can be used to inspect and debug our publisher — subscriber system.
At the end of that part, I gave a mini exercise and mentioned that the solution of that exercise will be given in part 10 of this tutorial series.
To remind all of you, the exercise give was:
- Create a publisher which publishes random integers from 0 to 10 on a topic.
- Create a subscriber node which receives these messages, divides them by 2 and then displays the new number.
Let's name this simple mini project, a number processor system.
So in this article, I will step by step explain and create this system. I advise you to follow and engage in hands on coding along with me while reading this article.
Practical implementation is not built by only reading articles. It is built by deliberately focusing on hands on engineering skills.
By the end of this article and the next one which comes just after it, you will gain the ability to independently build such systems without anyone's help under the condition that you follow every step being told.
This is article 10.1, where we will build the publisher required to complete our mini exercise and then in part 10.2 we shall focus on subscriber node.
Without wasting any further of your time, let's begin!
Step 1: Understand and Break Down the System
This is the first and most important step to build any system!
Don't just blindly open your VS Code, understand and break down what the problem demands.
The problem basically says that we have to build a system where a publisher is publishing random integers ranging from 0 to 10 and subscriber node is receiving these messages, dividing by them by 2 and then displaying it.
Now break down this system into it's sub systems or you can say sub components.
There are essentially two sub components present here. The first one is a publisher node and the second one is a subscriber node.
Now focus on one component, let's say the publisher one.
The work of this component is to publish random integers lying between 0 to 10 on a topic.
That's it, nothing else!
Now focus on building solely this component. Forget the other one for now.
The second approach is to pick up the second component, which is the subscriber node.
The work of this component is to receive the numbers being published on the topic, divide them by 2 and then display the new number.
Now focus solely on this component, forget the other one.
What I am trying to say is that pick one component first and build it then go to the another one.
I am writing this article with the assumption that you are a beginner who is working for the first time on a system like this. For beginners, the recommended approach is to first focus solely on one component instead of getting confused by focusing on the entire system as a whole.
I will continue this article by adopting the first approach, which is to first focus on the publisher component. If you wish you can also go by the second approach by focusing on the subscriber node first.
Both the approaches are equally valid paths to build this system, if you execute them correctly.
Step 2: Understanding and Building the Publisher Component
Since we are building the publisher component first so we must have some pre — requisite knowledge about how to make it.
In part 6 and 7 of this tutorial series we already covered how to make a publisher node. I am not asking you to memorize each and every line, but you should have a clear mental map of what a publisher node consists of.
Let's construct this mental map quickly in your mind, in case you have forgotten it.
- While creating a publisher node, first we have to import all the required classes and libraries. Since we are creating a python node so the required libraries and classes are the rclpy library, Node class from node module of this library, the message type which we will be using to send messages and then random module which will be used to generate random integers.
- The second step is to create a class and define your publisher object inside the constructor of that class. By defining publisher object, I mean specifying the arguments of create_publisher method like message type, topic name and QoS history depth. This step also involves using the super class constructor statement to assign a name to our node.
- The third step is to create a timer using create_timer method and assign it a timer callback method.
- The fourth step is to write the code required to publish message to our topic inside the timer callback, so that whenever it runs our message will be published.
- The fifth step is to create a function named main outside the class inside which we will create an object of this class which will become our node. This function acts as an entry point and has to be specified in the setup.py file later on while creating an executable.
This step by step mental map which you must keep in your mind has been depicted in the form of a flowchart, as shown below.
┌───────────────────────────────────────────────┐
│ Step 1: Import Required Dependencies          │
│  • rclpy library                              │
│  • Node class                                 │
│  • Required message type                      │
└───────────────────────────────────────────────┘
                     │
                     ▼
┌───────────────────────────────────────────────┐
│ Step 2: Create Publisher Class                │
│  • Inherit from Node                          │
│  • Call super() constructor                   │
│  • Assign node name                           │
│  • Create publisher object                    │
│      - Message type                           │
│      - Topic name                             │
│      - QoS depth                              │
└───────────────────────────────────────────────┘
                     │
                     ▼
┌───────────────────────────────────────────────┐
│ Step 3: Create Timer                          │
│  • Use create_timer()                         │
│  • Specify timer period                       │
│  • Attach timer callback function             │
└───────────────────────────────────────────────┘
                     │
                     ▼
┌───────────────────────────────────────────────┐
│ Step 4: Write Timer Callback                  │
│  • Create message object                      │
│  • Fill message data                          │
│  • Publish message to topic                   │
└───────────────────────────────────────────────┘
                     │
                     ▼
┌───────────────────────────────────────────────┐
│ Step 5: Create main() Function                │
│  • Initialize rclpy                           │
│  • Create node object                         │
│  • Spin the node                              │
│  • Shutdown rclpy                             │
│  • Used as executable entry point             │
└───────────────────────────────────────────────┘
We will follow this mental model to create our publisher node.
There is also a step which hasn't been mentioned in this flowchart. That step is the most basic step which you have to follow every time whenever you are making any system at any level, from beginner to advanced.
This step is to create a workspace and a package. Only after these things are created, you can start working on your publisher node.
Let's call this step as step 0.
As you already know, you can choose a name of your choice for your package and workspace. I am choosing the name ros2-tutorial-part-10 and number_processor for my workspace and package respectively.
After step 0, we will follow the mental map which we just discussed starting from the step 1.
Step 1: Import Required Dependencies
Before importing dependencies there is one thing which you need to pay attention to and that is shebang.
Shebang tells our operating system which interpreter should be used to execute this python file. The shebang which we will use is:
#!/usr/bin/env python3
The first dependency which we will import after writing shebang is the rclpy library. This library provides us with all the functionality to write python nodes.
To import this dependency, we will write the following line:
import rclpy # Importing first dependency
The statement written after the hashtag symbol (#) is a comment. It doesn't gets processed when interpreter executes our python file. So you can either write it or ignore it.
It all depends on your choice.
Now the second dependency which should be imported is the Node class from the node module of the rclpy library.
Node class is very important because it helps us create Node objects which serve as our ROS 2 nodes in python.
To do so we will type the following line:
from rclpy.node import Node # Importing second dependency
We are creating a publisher node. The purpose of a publisher node is to publish some data to a particular topic. For this data transfer, we need a message type.
As stated earlier, Int64 message type will be used for this data transfer. To use this message type, we have to first import it.
This message type is a part of the example_interfaces package.
To import it, we will write the following line:
from example_interfaces.msg import Int64
Now we have imported all the three required dependencies in our python file, but there is one more thing which needs to be completed.
The packages which we have imported must be added as a dependency in the package.xml file of our package.
This is actually a very crucial step!
If you have used some another package, but you haven't added it as a dependency then while building the workspace there is a very high probability of getting an error.
By default whenever we create a python package, then rclpy automatically gets added as a dependency in package.xml file. We have also used the example_interfaces package in our python file, so we need to add it as a dependency too.
To do so open the package.xml file of your workspace.
You will see the following line, inside this file:
<depend>rclpy</depend>
Below this line, add the following one:
<depend>example_interfaces</depend>
Now when you will run colcon build later after building this node, then you won't get any errors because you have correctly listed the required dependencies.
Here by errors, I mean you won't get any dependency errors. But you can still get some other type of error if you have made some mistake while making the node.
To avoid such mistakes, read carefully and follow along.
As mentioned earlier, that in this exercise we basically have to create a publisher which publishes random integers from 0 to 10.
To do so we have to import the random module provided by python. This library comes with Python's standard library so there is no need to install it.
Just write the following line, to import it:
import random
Note: This line must be written in the python file in which you are creating your publisher node, not in the package.xml file.
This marks the end of the first step to make our publisher node.
We have imported the required packages and libraries in our python file and we have also added them as dependencies in our package.xml file.
Now it is time to start the second step!
Step 2: Create Publisher Class
We will create a publisher class, which will is basically a child class of the Node class which we have already imported.
Let's name this class — Publisher.
To create this child class named Publisher, we will write the following line:
class Publisher(Node):
Inside this class, we have to create a constructor, inside which we will create the publisher object.
def __init__(self):
Now inside this function, which is the constructor of our class, we have to use the super class constructor call statement to assign a name to our node.
Let's suppose I want to assign the name, "number_processor_publisher" to this node.
To do so I will write the following line in the constructor of my class:
super().__init__("number_processor_publisher")
Now we have to create a publisher object. A publisher object can be created using the create_publisher method of the Node class. After using this method an object of the Publisher class is created.
Here by object of the Publisher class, I mean the Publisher class of the rclpy library, not the the Publisher class which we created.
This is an important distinction!
The Publisher class which we created and the Publisher class which exists inside the rclpy library are two very different things, even though there name is the same.
If we don't store the reference to this object, then python's garbage collector will likely clean up the publisher node after some time.
To store the reference of the object, I will be using the publisher_ variable. Since we are working with classes, so this variable will become one of the attributes of our classes.
Therefore it will be written as — self.publisher_.
To create this publisher object, write the following line just after the super class constructor call statement:
self.publisher_ = self.create_publisher(Int64, "number_processor_topic", 10)
I have chosen the name — "number_processor_topic" as my topic name in which my publisher node will publish message.
You can choose some other name of your choice, if you want. But whatever name you choose must follow the naming convention of topics defined by ROS 2.
I have already discussed about this naming convention in part 8. You can read the naming convention by clicking here.
To summarize till now, we have written this much of code:
#!/usr/bin/env python3
import rclpy  # Importing first dependency
from rclpy.node import Node  # Importing second dependency
from example_interfaces.msg import Int64
import random  # For generating integers between 0 to 10

class Publisher(Node):
    def __init__(self):
        super().__init__("number_processor_publisher")  # Using the super class constructor call statement to assign node name
        self.publisher_ = self.create_publisher(Int64, "number_processor_topic", 10)  # Creating publisher object
Make sure the code you have written till now matches this code, which I have shared.
You can ignore the comments while writing the code yourself. I have just written them, in case someone finds the code difficult to understand.
Now it is time to move to step 3, after you have completed till this part!
Step 3: Create Timer
To continuously publish messages on the topic, we need a timer which invokes a timer callback function every time after a specified time duration passes.
To implement a timer we have to use a create_timer() function, which returns an object of the Timer class.
This object allows us to create and access various functionalities related to timers.
Just like the previous step in which we created the publisher object, we have to store the reference of the timer object.
I have decided to use the timer_ variable to store the reference.
Since we are using classes, so timer_ will be an attribute of the class, hence it will be written as: self.timer_.
To create the timer object write the following line inside the constructor, just below the line in which we have created publisher object:
self.timer_ = self.create_timer(1.0, self.timer_callback)
I have chosen the name — timer_callback for my timer callback function.
This is basically the end of the step 3. Now we will move to step 4!
Step 4: Writer Timer Callback
A timer callback is basically a function which gets invoked by timer every time after a specified duration.
In our case, as seen in the previous step, we passed 1.0 as the first argument of the create_timer() method.
Therefore, after each second our timer callback will be invoked.
As you can see in the second argument, of the create_timer() method we wrote: self.timer_callback, which means the name of our callback function is timer_callback and it is a method of the class.
So after giving proper indentation, we will create a new function with this name.
To create this function write the following line:
def timer_callback(self):
Now inside this function we have to write the code to publish our message, which in this case is random integers between 0 to 10.
We will use the randint() function offered by the random module to generate numbers and then we will use the publish() method of Publisher class to publish the messages.
Here by Publisher class, I again mean the Publisher class of rclpy library, not the one which we created.
To achieve this we have to add some lines inside the timer_callback(), function. After adding them our function becomes:
def timer_callback(self):
    msg = Int64()
    msg.data = random.randint(0, 10)
    self.publisher_.publish(msg)
    self.get_logger().info(f"Message published: {msg}")
The last line is optional. You can remove it if you want to, but it is useful for debugging as it allows us to know whether the callback is running or not.
Note: If you cannot understand any particular line or the syntax of lines which I have written till now, then I would recommend you to read part 6 and 7 of this tutorial series. In these two parts, I discussed each and every line of the publisher node in a highly detailed manner.
This marks the end of out step 4 of creating the publisher node.
Now we will move to the final step which is step 5!
Step 5: Create main() function
After writing the code for the publisher we have to create an entry point. An entry point is basically a function using which our executable can run our node.
You can assign any name to this function as long as it is within the naming conventions of python, but the preferred name is main().
So I will create a global function named main(), which is not a method of the class. A global function is basically a function which can be accessed from anywhere inside a python file as it exists in the global environment.
Any entry point which you create in python for ROS nodes is usually a global function, otherwise your executable might not work or you would need a lot of workarounds to make it work.
Till now we have written this much of code:
#!/usr/bin/env python3
import rclpy  # Importing first dependency
from rclpy.node import Node  # Importing second dependency
from example_interfaces.msg import Int64
import random  # For generating random integers from 0 to 10

class Publisher(Node):
    def __init__(self):
        super().__init__("number_processor_publisher")  # Using the super class constructor call statement to assign node name
        self.publisher_ = self.create_publisher(Int64, "number_processor_topic", 10)  # Creating publisher object
        self.timer_ = self.create_timer(1.0, self.timer_callback)

    def timer_callback(self):
        msg = int64()
        msg.data = random.randint(0, 10)
        self.publisher_.publish(msg)
        self.get_logger().info(f"Message published: {msg}")
Now we will start creating the main() function.
Note: main() function must be created outside the class. It shouldn't become a method of the class.
Inside the main() function, we first have to initialize the ROS 2 client library for python and only after this initialization we can create out node.
After the node is created, we have to use rclpy.spin() to make sure that callbacks keep running. At then end we have to use the rclpy.shutdown() statement to cleanly kill the ROS 2 process which has been started for this node.
So our main() function becomes:
def main():
    rclpy.init()
    node = Publisher()
    rclpy.spin(node)
    rclpy.shutdown()
Now we will add the following line, after creating the main() function to ensure that the entry point for our executable is fully created:
if __name__ == "__main__":
    main()
Till now we have completed two major steps.
The first one was to understand and break down the system while the second one was to create the publisher node.
These 5 steps which we just discussed are classified as mini steps which comes under the second major step.
This is the entire code which we have written so far:
#!/usr/bin/env python3
import rclpy  # Importing first dependency
from rclpy.node import Node  # Importing second dependency
from example_interfaces.msg import Int64
import random  # For generating random integers from 0 to 10

class Publisher(Node):
    def __init__(self):
        super().__init__("number_processor_publisher")  # Using the super class constructor call statement to assign node name
        self.publisher_ = self.create_publisher(Int64, "number_processor_topic", 10)  # Creating publisher object
        self.timer_ = self.create_timer(1.0, self.timer_callback)

    def timer_callback(self):
        msg = Int64()
        msg.data = random.randint(0, 10)
        self.publisher_.publish(msg)
        self.get_logger().info(f"Message published: {msg}")

def main():
    rclpy.init()
    node = Publisher()
    rclpy.spin(node)
    rclpy.shutdown()

if __name__ == "__main__":
    main()
Now comes the third major step!
Step 3: Create an Executable to run our Publisher Node
We have written the code for our publisher node, but we haven't yet created an executable which will allow us to run it.
To do so, open the setup.py file of your package and find the console scripts section written in it.
This section is usually present near the bottom of the setup.py file.
Your setup.py file will have code similar to the following one:
from setuptools import find_packages, setup

package_name = 'number_processor'

setup(
    name=package_name,
    version='0.0.0',
    packages=find_packages(exclude=['test']),
    data_files=[
        ('share/ament_index/resource_index/packages',
            ['resource/' + package_name]),
        ('share/' + package_name, ['package.xml']),
    ],
    install_requires=['setuptools'],
    zip_safe=True,
    maintainer='satyarth-shree',
    maintainer_email='satyarth-shree@todo.todo',
    description='TODO: Package description',
    license='TODO: License declaration',
    extras_require={
        'test': [
            'pytest',
        ],
    },
    entry_points={
        'console_scripts': [
        ],
    },
)
Before creating an executable we must first decide the name of our executable. I have chosen the name — number_publisher.
So after giving proper indentation, I will write the following line in the console scripts section:
"number_publisher = number_processor.number_publisher:main"
After adding this line, our setup.py file will now look like this:
from setuptools import find_packages, setup

package_name = 'number_processor'

setup(
    name=package_name,
    version='0.0.0',
    packages=find_packages(exclude=['test']),
    data_files=[
        ('share/ament_index/resource_index/packages',
            ['resource/' + package_name]),
        ('share/' + package_name, ['package.xml']),
    ],
    install_requires=['setuptools'],
    zip_safe=True,
    maintainer='satyarth-shree',
    maintainer_email='satyarth-shree@todo.todo',
    description='TODO: Package description',
    license='TODO: License declaration',
    extras_require={
        'test': [
            'pytest',
        ],
    },
    entry_points={
        'console_scripts': [
            "number_publisher = number_processor.number_publisher:main"
        ],
    },
)
If you are confused about the syntax which we have followed while creating this executable, then I would recommend you to read part 2 of this tutorial series.
There I have explained how you can create an executable in more depth, which is why I have covered it briefly over here.
Now we have created both the things — our publisher node as well as our executable to run it.
The next major step is to build the workspace and then test our publisher node, whether it is properly working or not.
Step 4: Building our Workspace and then Inspecting our Publisher node using Command Line Tools
After you have completed everything till step 3, follow this one.
Move to the root of your workspace and then build it using the following command:
colcon build
After building, it source the workspace by typing the following command:
source install/setup.bash
These commands must be executed sequentially, as shown in the image below:
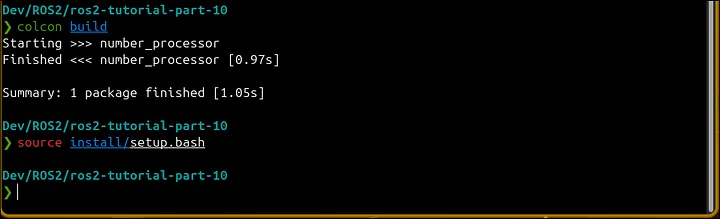
Figure 1: Building and sourcing our workspace
If you are getting some errors then you would have likely made some mistake in one of these three files:
- number_publisher.py (The python file in which we have created our node)
- setup.py file (The python file in which we have created our executable)
- package.xml (The xml file in which we have added example_interfaces package as a dependency)
Most common type of error which people do while working with ROS 2 nodes is syntax errors. If you miss even a comma in critical files like package.xml or setup.py, then you will find errors when you try to build your workspace.
Sometimes no error will be shown and build will be successful but your node will fail to run.
So make sure you are following whatever has been told in this article as it is to avoid any syntax errors.
Now comes the fifth major step in which we will run our publisher node and inspect it via command line tools.
Step 5: Running and Inspecting our Publisher Node
A common mistake that beginners do is that they make an entire system at once and then they wonder, where is the error, if it isn't working.
ROS 2 is a middleware which has been designed to support modular software structures. So instead of building both the publisher and subscriber at once and then wondering why the system is not working, we will focus on the working on individual components first.
Till now we have built one component, which is the publisher component. Before building the subscriber component, we will first check whether this component is working properly or not.
This is exactly what we will be doing in this section.
In my case, the name of the package inside which I have created my node is number_processor and the name of the executable which I have created to run this node is number_publisher.
So to run my node, I will execute the following command in the same terminal instance where I have sourced my workspace:
ros2 run number_processor number_publisher
You will see output being displayed:
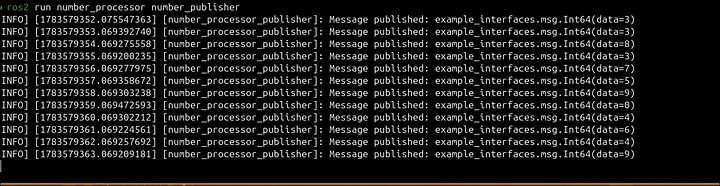
Figure 2: Output obtained after running publisher node
This output is been displayed because we used the get_logger() method in our timer callback.
To properly verify whether our publisher node is working or not we will now use the CLI tools about which we discussed in the part 9 of this tutorial series.
Keep this terminal running as it is and open a second terminal instance. In this second terminal, write the following command and press enter:
ros2 topic list
You will get the following output after you run this command:
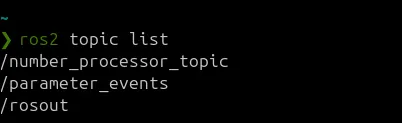
Figure 3: Output of the command — ros2 topic list
As you can see in figure no. 3, there are three different topics which are currently running. Out of these three the one on which our node is publishing messages is — "/number_processor_topic".
The other two topics shown in the image are created automatically by ROS 2 whenever we run a node, so you don't have to do anything about them.
To find the data being published on our topic, we will use the following command:
ros2 topic echo /number_processor_topic
If your publisher node is working correctly, then you will see the following output being displayed:
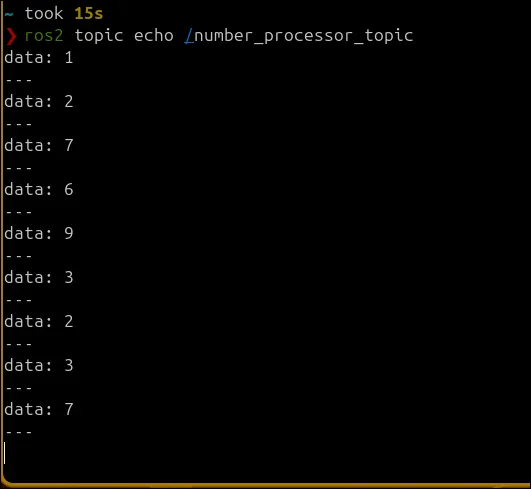
Figure 4: Output of the command — ros2 topic echo /number_processor_topic
As you can see in figure 4, numbers being published on the topic are in between 0 and 10.
This is exactly what our publisher node was intended to do. Random numbers between 0 and 10 are getting published, which means our publisher node is working without any issues.
So we basically ran and inspected our node. It is entirely possible that your publisher node is not working properly because you have made some mistakes while writing code.
Now I will tell you how to debug a system when it isn't working properly.
If you have got the publisher running then you can skip the next section, but I would recommend reading it as it gives you some important debugging system.
If you got some errors and didn't succeeded in building this sub system then you should definitely read the next section.
Step 6: Debugging and Troubleshooting our Sub System
First step of debugging a system is understanding the area where the possibility of errors is the maximum.
I call this methodology — "The Scope of Error".
This is not a widely used technical word. Instead, it is something that I started using myself, when I started spending significant time coding.
Step 1: Identifying the Scope of Error
Here is the catch, when some error occurs most people start by checking everything which creates panic.
When we are working on a complex project where multiple dependencies are involved which work in different environments then finding the scope of error becomes much harder.
But in our case we are building a small component of a relatively simple system, so finding Scope of Error is relatively easy.
The component which we are working on is the one you already know, the publisher component.
Now to find the scope of error, ask yourself the following question:
Where was the most manual work done?
The area where the most amount of manual work was done is the area where the possibility of finding manual errors is usually the highest!
The answer of the question is inside the src folder. You are right about that, but reduce the scope even more.
We were primarily working in the number_processor package. So you may think that this is our scope.
You are right, but reduce the scope even more.
You will realize that the most amount of work was done in the following three files:
- Your python node file (which is number_publisher.py in my case)
- setup.py file
- package.xml file
So is this the scope of your error?
I would say the answer to this question is — almost, but not entirely.
But why, so?
Because there is one more area where manual work was done.
That area is terminal. We ran two commands in terminal — one to build our workspace and the second one to source our workspace.
These two commands may seem insignificant in size when compared with the large python file in which we have written our code, but they hold immense power.
If you ran even a single of these two commands from the wrong directory, then your node won't run no matter how good your source code is.
So basically I would say the correct Scope of Error from the system is the three files which I listed earlier and your terminal.
I am very much confident that if you got some error in this part of our mini exercise then you have likely made a mistake in one of these four areas.
One of the most effective way to identify the scope of error is to read the terminal logs which gets displayed whenever some error occurs.
A common issue is that terminal logs are lengthy and it's tough to identify the error just by reading it, as it is not written in plain easily understandable english.
But I would recommend you to try reading the error logs even if you find that difficult right now, so that you can gradually build your ability to debug systems independently.
Now since we have identified the scope of error, let's move to the step 2 of debugging.
Step 2: Entry Point of the Scope of Error
"Entry point of the Scope of Error" is another term which I frequently use when I talk with myself during development and coding sessions.
After you have identified the Scope of Error, the Entry point of the scope of error is the file or the area of scope which you want to explore first.
In my case I have decided that the entry point of scope of error will be the python file which consists our node.
If you have made some syntax error in the node, then even if after building and sourcing your workspace correctly, you will keep getting errors.
Make sure your python node file resembles exactly this structure:
#!/usr/bin/env python3
import rclpy  # Importing first dependency
from rclpy.node import Node  # Importing second dependency
from example_interfaces.msg import Int64
import random  # For generating random integers from 0 to 10

class Publisher(Node):
    def __init__(self):
        super().__init__("number_processor_publisher")  # Using the super class constructor call statement to assign node name
        self.publisher_ = self.create_publisher(Int64, "number_processor_topic", 10)  # Creating publisher object
        self.timer_ = self.create_timer(1.0, self.timer_callback)

    def timer_callback(self):
        msg = Int64()
        msg.data = random.randint(0, 10)
        self.publisher_.publish(msg)
        self.get_logger().info(f"Message published: {msg}")

def main():
    rclpy.init()
    node = Publisher()
    rclpy.spin(node)
    rclpy.shutdown()

if __name__ == "__main__":
    main()
There should be zero syntax mistakes!
After you have ensured that your python node matches exactly this structure, then you can reduce your scope of error even more.
Now the error is likely in these three areas:
- setup.py file
- package.xml file
- The terminal instance from where you ran the node
First we will inspect the setup.py file. Make sure you have correctly added your node as an executable. Syntax plays very important role here.
My setup.py file which works correctly is having the following structure:
from setuptools import find_packages, setup

package_name = 'number_processor'

setup(
    name=package_name,
    version='0.0.0',
    packages=find_packages(exclude=['test']),
    data_files=[
        ('share/ament_index/resource_index/packages',
            ['resource/' + package_name]),
        ('share/' + package_name, ['package.xml']),
    ],
    install_requires=['setuptools'],
    zip_safe=True,
    maintainer='satyarth-shree',
    maintainer_email='satyarth-shree@todo.todo',
    description='TODO: Package description',
    license='TODO: License declaration',
    extras_require={
        'test': [
            'pytest',
        ],
    },
    entry_points={
        'console_scripts': [
            "number_publisher = number_processor.number_publisher:main"
        ],
    },
)
As you can see I gave proper indentation inside the console scripts section, before writing the line to create my executable. The line I have written to create my executable is:
number_publisher = number_processor.number_publisher:main
Here number_publisher is the name of my executable, number_processor is the name of the package inside which my node lives.
The node is created inside the number_publisher.py file. In this file, the main() function acts as an entry point to the node which is written after the package name — number_publisher:main is written after being separated by a dot.
So make sure the line which you have used to create your executable follows this syntax. To learn how to create an executable you can visit part 2. There a more in depth explanation has been provided.
Now we have verified two things. The first one is the python file inside which we have created our node while the second one is setup.py file.
If you had done any error in these two portions then it must have been resolved by now.
If your error is still not resolved then continue reading.
Now we will inspect the package.xml file.
Make sure in the package.xml file you have included this line:
<depend>example_interfaces</depend>
Just after the line:
<depend>rclpy</depend>
I faintly remember once I wrote:
<depend>example_interfaces<depend>
Instead of
<depend>example_interfaces</depend>
As you can see I just missed a slash (/) symbol which might seem insignificant compared to huge lines of code.
But package.xml is a file of significant importance for ROS 2 Build Systems as it gives a lot of information about a package and plays a very important role during the compilation process.
When I made this mistake, my build command ran without any errors.
But after I sourced the workspace, I realized my other packages got sourced but not this one on which I was currently working.
A minor slash symbol was not easily visible to me when I tried to debug my system, because I focused on large files like the python node file.
It took me 2 hours to realize that I have missed a small slash. After I corrected my mistake and again ran the build and source commands, then my package was properly sourced.
What I concluded from this session was that even though colcon build ran successfully without any errors, my package was not registered as a package by ROS 2 Build Systems because of a minor syntax error in one line of the package.xml file.
ROS 2 Internals are very complex. Sometimes commands will run smoothly without showing any signs of error but things will start failing silently. So make sure there are absolutely no errors in critical files like package.xml and setup.py which are of very high importance to ROS 2 build systems during the compilation process.
Now there is one more thing left to debug!
Step 3: Analyzing Terminal Instance for Errors
Focus on the terminal in which you ran the command to build and source your workspace.
Make sure that these two commands were executed from the root of your workspace and not from any sub folder present inside it.
If you ran the command to build your workspace from some another folder then your packages won't be properly compiled by ROS 2 build systems. Since compilation has not been done properly so your node won't work even if you source the workspace.
If you have done this mistake of building from some another folder then navigate inside that folder via the cd command, and then execute the following command:
rm -rf build/ install/ log/
This command will wipe out the files and folders which are automatically generated by ROS 2 build systems during the compilation process.
Now navigate to the root of your workspace and type these commands one by one:
colcon build
source install/setup.bash
Now your node will start working properly if all the errors which we discussed before have been fixed!
Conclusion
This marks the end of this article. In the next one which is part 10.2, we will discuss how to make the subscriber component and by then our entire mini exercise will be completed.
If you have followed all the steps mentioned in this article religiously, then your publisher component must be running successfully now.
Stay Tuned and Keep learning!
About the Publication — ROS Simplified
ROS Simplified is a learner-driven publication dedicated to making ROS (Robot Operating System) concepts clear, practical, and accessible. We provide tutorials, conceptual explainers, and project walkthroughs designed to help students, hobbyists, and engineers understand and apply ROS efficiently.
If you want to receive notifications of tutorials like these directly in your inbox then you can subscribe to ROS Simplified by visiting the publication using links given below.
This blog has also been published under the publication — ROS Simplified.
To view other parts of this ROS 2 Tutorial series click here.
About the Author
Hi, I am Satyarth Shree, a second-semester BTech Robotics and Automation student at Lovely Professional University (LPU), India. I am an aspiring robotics engineer who is publicly documenting his learning journey using platforms like Medium and Substack.
My areas of interest include ROS, python and mathematics. Currently, I am focusing on ROS more. I have also started a publication named ROS Simplified to make ROS accessible to everyone by providing beginner-friendly tutorials free of cost.
Let's Connect
- My Github: https://github.com/Satyarth-Shree
- My LinkedIn: https://www.linkedin.com/in/satyarth-shree-761357374/
- My CodeWars: https://www.codewars.com/users/Satyarth-Shree
- My X: https://x.com/BuildUnderdog
- My Hashnode: https://hashnode.com/@SatyarthShree
- My Portfolio: https://satyarthshree.com
To professionally contact me for internships, collaborations or similar opportunities click here: https://forms.gle/SH9bj1oJwqPtJtD26
Tags: Ros2, Robotics, Python, Robot Operating System, Ros2 Tutorial
Written by Satyarth Shree 32 followers · 22 following Aspiring Robotics Engineer | Exploring code, logic, and machines. Sharing my journey in robotics and programming. 🤖✨